
[cmsmasters_row data_shortcode_id=”7gh5vjw5g” data_padding_bottom_mobile_v=”0″ data_padding_top_mobile_v=”0″ data_padding_bottom_mobile_h=”0″ data_padding_top_mobile_h=”0″ data_padding_bottom_tablet=”0″ data_padding_top_tablet=”0″ data_padding_bottom_laptop=”0″ data_padding_top_laptop=”0″ data_padding_bottom_large=”0″ data_padding_top_large=”0″ data_padding_bottom=”50″ data_padding_top=”0″ data_bg_parallax_ratio=”0.5″ data_bg_size=”cover” data_bg_attachment=”scroll” data_bg_repeat=”no-repeat” data_bg_position=”top center” data_color=”default” data_bot_style=”default” data_top_style=”default” data_padding_right=”3″ data_padding_left=”3″ data_width=”boxed”][cmsmasters_column data_width=”1/1″ data_shortcode_id=”wg0k3ra7mn” data_border_style=”default” data_animation_delay=”0″][cmsmasters_button shortcode_id=”rz8yo58065″ button_link=”https://www.corsair.com/us/en/Categories/Products/Liquid-Cooling/iCUE-RGB-PRO-XT-Coolers/p/CW-9060044-WW” button_target=”blank” button_text_align=”center” button_font_weight=”default” button_font_style=”default” button_text_transform=”default” button_border_style=”default” animation_delay=”0″]Product on Review : CORSAIR iCUE H115i RGB PRO XT [/cmsmasters_button]
[cmsmasters_divider shortcode_id=”d6wby12afj” width=”long” height=”0″ style=”solid” position=”center” margin_top=”10″ margin_bottom=”10″ animation_delay=”0″]
[cmsmasters_button shortcode_id=”lhtid68m2c” button_link=”https://www.corsair.com” button_target=”blank” button_text_align=”center” button_font_weight=”default” button_font_style=”default” button_text_transform=”default” button_border_style=”default” animation_delay=”0″]Manufacturer: CORSAIR [/cmsmasters_button]
[cmsmasters_divider shortcode_id=”3ooqiwz2tu” width=”long” height=”0″ style=”solid” position=”center” margin_top=”10″ margin_bottom=”10″ animation_delay=”0″]
[cmsmasters_text shortcode_id=”f22g4s3272″ animation_delay=”0″]
Important note: CORSAIR provided the sample for this review although we are providing our honest and objective product review based on our testings.
[/cmsmasters_text][cmsmasters_featured_block shortcode_id=”ca4jespmdd” text_width=”100″ text_position=”center” text_align=”left” top_padding=”0″ bottom_padding=”0″ border_style=”default” animation_delay=”0″]
Introduction
CORSAIR is constantly pushing the envelope within the PC industry, seemingly competing with themselves more often than the competition, at least within the all-in-one water-cooling market, which leads us onto today’s review of the H115i RGB PRO XT.
![]()
The new H115i RGB PRO XT features a pair of CORSAIR ML140 PWM fans for high air pressure offered by the magnetic levitation and optimized blade shape. The iCUE software is also capable of stopping the fans completely in the “Zero RPM Mode”.
[/cmsmasters_featured_block][cmsmasters_text shortcode_id=”slnc9p0ixp” animation_delay=”0″]

With a total of 16 individually addressable RGB LEDs in the pump enclosure and standard ML140 fans, the product’s RGB lighting finds itself somewhere between the H115i PRO and H115i Platinum.
With support for all of Intel and AMD’s mainstream socket types, including TR4, the iCUE H115i is ready to go, but is it worth your money? Let’s find out.
CORSAIR on the iCUE H115i RGB PRO XT:
The CORSAIR iCUE H115i RGB PRO XT is an all-in-one liquid CPU cooler built for both low noise operation and extreme CPU cooling, with a 280mm radiator, two CORSAIR ML140 PWM fans, and 16 RGB LEDs.
[/cmsmasters_text][/cmsmasters_column][/cmsmasters_row][cmsmasters_row data_shortcode_id=”krxyoy8knh”][cmsmasters_column data_width=”1/1″][cmsmasters_heading shortcode_id=”smyicyev8d” type=”h2″ font_weight=”default” font_style=”default” text_align=”center” color=”#ffffff” bg_color=”#000000″ margin_top=”0″ margin_bottom=”20″ animation_delay=”0″]Technical Specifications[/cmsmasters_heading][cmsmasters_table shortcode_id=”t12976553h” animation_delay=”0″][cmsmasters_tr][cmsmasters_td align=”left”]Cooling Warranty[/cmsmasters_td][cmsmasters_td align=”left”] Five years[/cmsmasters_td][/cmsmasters_tr][cmsmasters_tr][cmsmasters_td align=”left”]Coldplate material[/cmsmasters_td][cmsmasters_td align=”left”]Copper[/cmsmasters_td][/cmsmasters_tr][cmsmasters_tr][cmsmasters_td align=”left”]Thermal paste[/cmsmasters_td][cmsmasters_td align=”left”]Pre-applied[/cmsmasters_td][/cmsmasters_tr][cmsmasters_tr][cmsmasters_td align=”left”]Radiator Material[/cmsmasters_td][cmsmasters_td align=”left”]Aluminum[/cmsmasters_td][/cmsmasters_tr][cmsmasters_tr][cmsmasters_td align=”left”]PWM[/cmsmasters_td][cmsmasters_td align=”left”]YES[/cmsmasters_td][/cmsmasters_tr][cmsmasters_tr][cmsmasters_td align=”left”]CORSAIR iCUE Compatibility[/cmsmasters_td][cmsmasters_td align=”left”]YES[/cmsmasters_td][/cmsmasters_tr][cmsmasters_tr][cmsmasters_td align=”left”]Radiator Dimensions[/cmsmasters_td][cmsmasters_td align=”left”]322mm x 137mm x 27mm[/cmsmasters_td][/cmsmasters_tr][cmsmasters_tr][cmsmasters_td align=”left”]Fan Dimensions[/cmsmasters_td][cmsmasters_td align=”left”]140mm x 25mm[/cmsmasters_td][/cmsmasters_tr][cmsmasters_tr][cmsmasters_td align=”left”]Fan Speed[/cmsmasters_td][cmsmasters_td align=”left”]2000 RPM[/cmsmasters_td][/cmsmasters_tr][cmsmasters_tr type=”header”][cmsmasters_td type=”header” align=”left”]Cooling Socket Support[/cmsmasters_td][cmsmasters_td type=”header” align=”left”]Intel 1150/1151/1155/1156/2011/2066 AMD AM3/AM2/AM4/TR4[/cmsmasters_td][/cmsmasters_tr][cmsmasters_tr][cmsmasters_td align=”left”]Lighting[/cmsmasters_td][cmsmasters_td align=”left”]RGB[/cmsmasters_td][/cmsmasters_tr][cmsmasters_tr][cmsmasters_td align=”left”]Radiator Size[/cmsmasters_td][cmsmasters_td align=”left”]280mm[/cmsmasters_td][/cmsmasters_tr][/cmsmasters_table][cmsmasters_heading shortcode_id=”xjwdq0tw5o” type=”h2″ font_weight=”default” font_style=”default” text_align=”center” color=”#ffffff” bg_color=”#000000″ margin_top=”0″ margin_bottom=”20″ animation_delay=”0″]Packaging & Bundle[/cmsmasters_heading][cmsmasters_text shortcode_id=”2ys2hw10r2″ animation_delay=”0″]
In usual CORSAIR fashion, the bright yellow box catches the eye with a large image of the loop on the front.

The rear, which is something CORSAIR do well, is covered with specifications and a schematic of the radiator so you can make sure it’ll fit in your chassis.

Bundled in with the loop is a pair of 140mm ML140 fans, mounting hardware for Intel and AMD sockets (the Intel mounts are pre-installed onto the pump enclosure), a micro-USB to internal header cable, nuts, bolts and screws for installation and some paperwork.

[/cmsmasters_text][cmsmasters_heading shortcode_id=”ddkrnvk9x” type=”h2″ font_weight=”default” font_style=”default” text_align=”center” color=”#ffffff” bg_color=”#000000″ margin_top=”0″ margin_bottom=”20″ animation_delay=”0″]Closer Look[/cmsmasters_heading][cmsmasters_text shortcode_id=”4w3e24514a” animation_delay=”0″]
New to the RGB PRO XT range of AIO coolers is the black pump enclosure. The CORSAIR logo is illuminated by four RGB LEDs with a further 12 flanking that around the perimeter.
The Micro-USB connection remains on the left edge, with the remaining connections appearing out of the top.

Measuring in at 55mm x 55mm, the copper coldplate arrives with a layer of pre-applied thermal paste and is suitable for use on Intel Core CPUs as well as Ryzen and Threadripper.

The cables that protrude out of the top of the pump housing are a pair of 4-pin PWM fan connections, a SATA power connector and a 3-pin fan connection to allow your motherboard to monitor pump speeds.

The 4-pin PWM ML140 fans sport an operating range between 400RPM and 2000RPM, but can also be stopped entirely if the loop temperatures remain under 40°C, relying entirely on passive heat dissipation.

Utilising an all-aluminium construction, the radiator is tightly packed with cooling fins for optimal heat transfer. The radiator’s dimensions are 322mm x 137mm x 27mm (52mm with the fans installed).

The two included ML140 fans are spaced slightly, leaving around 4-5mm between them allowing for better cable management. Each corner is also slightly counter-sunk so the screws sit flush with the fan housing; sometimes these millimeters can make a difference when fitting against a tall VRM heatsink or into a tight chassis so we appreciate CORSAIR’s efforts here.
[/cmsmasters_text]
[cmsmasters_divider shortcode_id=”9suxogectx” width=”long” height=”0″ style=”solid” position=”center” margin_top=”10″ margin_bottom=”10″ animation_delay=”0″]
[cmsmasters_heading shortcode_id=”i42h4rblz” type=”h2″ font_weight=”default” font_style=”default” text_align=”center” color=”#ffffff” bg_color=”#000000″ margin_top=”0″ margin_bottom=”20″ animation_delay=”0″]Installation[/cmsmasters_heading][cmsmasters_text shortcode_id=”bujysi386g” animation_delay=”0″]
CORSAIR have the installation game nailed, they were definitely the easiest coolers to install thanks to a simple process and high-quality components that you could trust, however, we’re feeling a little let down overall by this latest iteration.
The first step is to insert the backplate into the rear of the motherboard then screw the four standoff screws into that. This is a simple process with well-engineered threads.

Next up, it’s usually best to mount the radiator before the pump, but attaching the fans to the radiator was a task in itself. Something we’ve experienced in the past was a soft aluminium used in the radiator’s construction which eventually wore away leaving no thread to screw into, essentially rendering the cooler useless. We’ve mentioned this to CORSAIR and they seem to have done something about it, using a stronger metal, but they’re gone too far. My arms were aching after doing up the 8 screws, despite being reasonably strong and fit. This would be a genuine struggle for some people.
Mounting the radiator into the case poses a similar problem, though there’s less depth to screw through.

It’s then time to set the pump into place, a simple task that can be done largely by hand. We preferred the old thumbscrews with their wider girth and deeper cross-pattern on top for tightening with a screwdriver but they get the job done.

Then tuck all of your cables behind the motherboard tray, plug in your micro-USB and power up. You might hear some initial gurgling from the system but that’s perfectly normal while air works its way out of the pump.
When all is said and done, the process is still simple but CORSAIR have taken a step backwards here, we feel.
[/cmsmasters_text][cmsmasters_heading shortcode_id=”ygyjhr9zm” type=”h2″ font_weight=”default” font_style=”default” text_align=”center” color=”#ffffff” bg_color=”#000000″ margin_top=”0″ margin_bottom=”20″ animation_delay=”0″]Test Setup & Methodology[/cmsmasters_heading][cmsmasters_text shortcode_id=”dtgoabfgek” animation_delay=”0″]
Due to popular demand, we have retired the long-standing cooling rig that we once used and replaced it with a shiny new system with an Intel Core i7 9700K at its heart. This should benefit you, the reader, in a couple of ways. The first being it can provide you with results on a CPU that is currently available to buy and secondly, the mounting instructions on our installation page will be far more relevant than the outgoing LGA 2066 was, with its pre-installed backplate.
We perform two individual testing routines with each CPU cooler that we receive – temperatures and acoustics. The system used is as follows and all tests are performed at stock frequencies.

Processor – Intel Core i7 9700K
Motherboard – GIGABYTE Z390 AORUS MASTER
Memory – Corsair Vengeance RGB PRO 16GB – 2666MHz – C16
Video Card – XFX AMD Radeon RX560
Power Supply – Corsair RM650x
Storage Drive – Western Digital Black SN750 1TB NVMe SSD
Case – Corsair Crystal Series 280X RGB
Monitor ASUS ROG SWIFT PG278Q
To keep our tests consistent, we always review CPU coolers as they come out of the box – with their factory cooling fans, as the manufacturer intended and as the consumer expects. It should, however, be noted that we do not use supplied thermal paste but instead, Noctua NT-H1 paste to, again, ensure consistency. The paste is applied and the CPU allowed to run for a couple of hours, at idle, to ensure any and all updates or processes are completed to give a true idle reading.
In the first test we record the idle and load temperatures across a 60 second period, with the results logged to file. This way we can provide you with an accurate average temperature over a longer period, instead of, for example, a maximum or minimum temperature. We believe this is the fairest possible method and most representative of what is going on as temperatures will fluctuate even with a consistent load on the CPU. We have three case fans on the front of the PC running with the door closed for this test.

We aim to measure acoustics with our second test, this time with the three case fans on the front disabled and all other ambient noise reduced to an absolute minimum. Our testing room measures around 25dB(A) without the system running. We measure the system acoustics for 60 seconds with the microphone in a set and unchanging position with the chassis door removed completely. An average is then taken across the 60 seconds.
[/cmsmasters_text][cmsmasters_heading shortcode_id=”ne5zfqed58″ type=”h2″ font_weight=”default” font_style=”default” text_align=”center” color=”#ffffff” bg_color=”#000000″ margin_top=”0″ margin_bottom=”20″ animation_delay=”0″]Benchmarks[/cmsmasters_heading][cmsmasters_text shortcode_id=”jx2tp9etle” animation_delay=”0″]
For thermal results we have all case fans running and only a single 120mm fan on our Corsair H100i Pro RGB radiator. We then measure the thermal results at idle, both at 1000 RPM and maximum RPM:
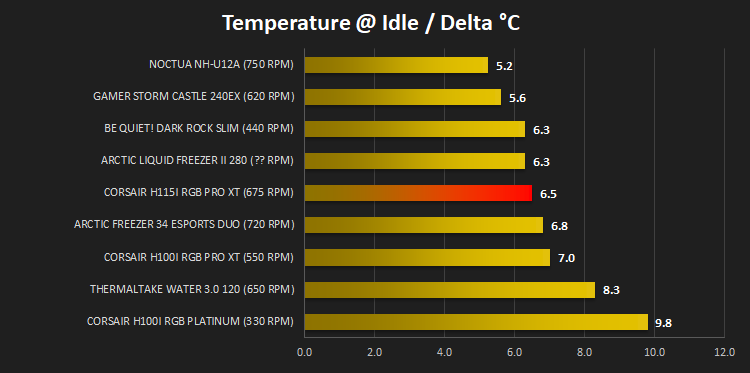
And then again after a 20 minute Stability Test within AIDA64:

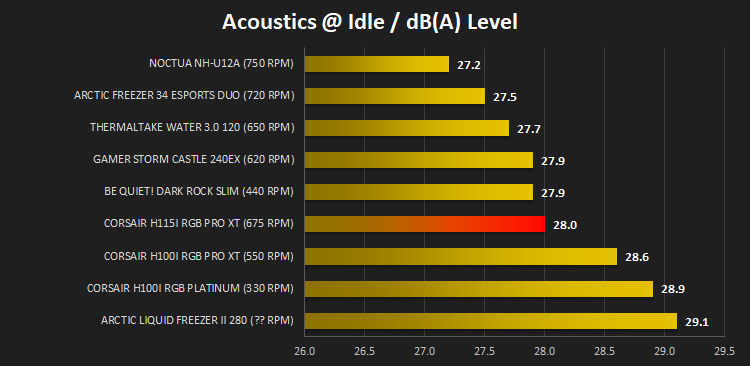
Acoustic Results
For our acoustic results, all other fans in the case are disabled and the Corsair’s H100i Pro RGB’s pump is turned down to quiet (roughly 1100 RPM) and measure the fan noise at 1000 RPM, both as a case fan and as a radiator fan:
And then again at maximum RPM:

[/cmsmasters_text]
[cmsmasters_divider shortcode_id=”ajdse3efne” width=”long” height=”1″ style=”solid” position=”center” margin_top=”10″ margin_bottom=”10″ animation_delay=”0″]
[cmsmasters_heading shortcode_id=”3z2kbv214r” type=”h2″ font_weight=”default” font_style=”default” text_align=”center” color=”#ffffff” bg_color=”#000000″ margin_top=”0″ margin_bottom=”20″ animation_delay=”0″]Conclusion[/cmsmasters_heading][cmsmasters_text shortcode_id=”kcqqodmqmr” animation_delay=”0″]
Aligning with the review of the H100i RGB PRO XT, the 240mm version, we again find ourselves wondering quite what CORSAIR are doing. This release is such a small ‘upgrade’ over the adjacent models that it feels like a launch for launch sake.What we do like, however, is the black enclosure on the pump. This is something we’re surprised didn’t come around sooner in CORSAIR’s AIO launches, the difference in appearance is huge, especially considering that the vast majority of motherboards, particularly those at the higher end of the market, have been black for some time now. The RGB lighting contrasts better against the black enclosure, but the lack of lighting on the fans is something we miss. If you’re going RGB, you go big, surely?
As we’ve all come to expect from CORSAIR, the performance is top-notch. You certainly won’t find yourself wishing for much more, but if you already own one of their water-cooling loops, don’t go rushing to the shops either.
Installation, something we’ve always praised CORSAIR’s AIOs for, has taken a step backward in terms of simplicity in the latest iteration. The aluminum that has been used on the radiator is much tougher than it was, which should make removing and replacing fans far more reliable, but the initial installation is tough. Perhaps CORSAIR could install the fans in the factory to remedy this issue.
For £8/$10 more, the Platinum seems like a better idea but if you really need that black pump enclosure, here’s your chance.

The RGB PRO XT range slots into a very small gap that, really, didn’t need to be filled, but it does look nice with the new black appearance.
+ Strong performance
+ Quiet under load
+ Black pump enclosure is a marked improvement over silver
+ TR4 socket support
+- Price
– Installation simplicity has taken a step backward
– No RGB fans
[/cmsmasters_text][/cmsmasters_column][/cmsmasters_row]


