
[cmsmasters_row data_shortcode_id=”rneu78otaj” data_padding_bottom_mobile_v=”0″ data_padding_top_mobile_v=”0″ data_padding_bottom_mobile_h=”0″ data_padding_top_mobile_h=”0″ data_padding_bottom_tablet=”0″ data_padding_top_tablet=”0″ data_padding_bottom_laptop=”0″ data_padding_top_laptop=”0″ data_padding_bottom_large=”0″ data_padding_top_large=”0″ data_padding_bottom=”50″ data_padding_top=”0″ data_bg_parallax_ratio=”0.5″ data_bg_size=”cover” data_bg_attachment=”scroll” data_bg_repeat=”no-repeat” data_bg_position=”top center” data_color=”default” data_bot_style=”default” data_top_style=”default” data_padding_right=”3″ data_padding_left=”3″ data_width=”boxed”][cmsmasters_column data_width=”1/1″ data_shortcode_id=”wg0k3ra7mn” data_border_style=”default” data_animation_delay=”0″][cmsmasters_button shortcode_id=”qwvjrh4dog” button_link=”https://www2.arctic.ac/liquidfreezer2/liquid-freezer-280-en/” button_target=”blank” button_text_align=”center” button_font_weight=”default” button_font_style=”default” button_text_transform=”default” button_border_style=”default” animation_delay=”0″]Product on Review : Arctic Liquid Freezer II 280[/cmsmasters_button]
[cmsmasters_divider shortcode_id=”ke0c2ruzlw” width=”long” height=”0″ style=”solid” position=”center” margin_top=”10″ margin_bottom=”10″ animation_delay=”0″]
[cmsmasters_button shortcode_id=”sadthukgh5″ button_link=”https://www2.arctic.ac” button_target=”blank” button_text_align=”center” button_font_weight=”default” button_font_style=”default” button_text_transform=”default” button_border_style=”default” animation_delay=”0″]Manufacturer: Arctic [/cmsmasters_button]
[cmsmasters_divider shortcode_id=”d7ij3bmz3g” width=”long” height=”0″ style=”solid” position=”center” margin_top=”10″ margin_bottom=”10″ animation_delay=”0″]
[cmsmasters_text shortcode_id=”38pbmz199q” animation_delay=”0″]
Important note: ARCTIC provided the sample for this review although we are providing our honest and objective product review based on our testings.
[/cmsmasters_text][cmsmasters_featured_block shortcode_id=”5kiukiwwy4″ text_width=”100″ text_position=”center” text_align=”left” top_padding=”0″ bottom_padding=”0″ border_style=”default” animation_delay=”0″]
Introduction
Arctic have been present in the aftermarket cooling market for some time now, producing iconic, cost-efficient air coolers for the masses; you’ve likely heard of, or possibly even owned, the Freezer 7 at some point. Today we look at the Liquid Freezer II, which as you’ve probably guessed, is an all-in-one cooling loop for AMD and Intel processors.
The Liquid Freezer II does things differently to most AIO watercooling loops by incorporating a small blower-style fan into the pump assembly, providing cooling to nearby VRM components which can go without adequate airflow when using loops from other manufacturers.

Providing plenty of airflow, Arctic have equipped the cooler with their excellent P-series fans. We’ve tested the BioniX P120 a while back and were truly impressed by its performance for such a cost-efficient fan so we’re hopeful similar should be possible here.
[/cmsmasters_featured_block][cmsmasters_text shortcode_id=”1ox7vfgfqp” animation_delay=”0″]

Helping to keep costs low, RGB lighting has been forgotten about. It’s not something Arctic tend to get involved in heavily anyway, and it’s a nice change from the usual RGB-ridden coolers with high pricetags. Our 280mm version is available for less than £80 here in the UK, making it easily one of the cheapest available.
Available in 120mm, 240mm, 280mm and 360mm, you’re well catered for dependent on your case size and which processor you plan to cool. Today we’re looking at the 280mm version, sporting a pair of P-series 140mm fans, so let’s strap this to our 9700K and see how it fares.
Arctic on the Liquid Freezer II:
At ARCTIC, we are proud of our completely new all-in-one CPU water cooler series. For the Liquid Freezer II Series, we have used our experience in CPU water cooling to develop a completely new compact water cooling pump. The new pump of the Liquid Freezer II Series ensures an ideal ratio of high CPU cooling performance to low noise levels.
[/cmsmasters_text][/cmsmasters_column][/cmsmasters_row][cmsmasters_row data_shortcode_id=”8ew85vs88″][cmsmasters_column data_width=”1/1″][cmsmasters_heading shortcode_id=”qydqyso9q” type=”h2″ font_weight=”default” font_style=”default” text_align=”center” color=”#ffffff” bg_color=”#000000″ margin_top=”0″ margin_bottom=”20″ animation_delay=”0″]Technical Specifications[/cmsmasters_heading][cmsmasters_table shortcode_id=”8ezz9snrop” caption=”General specifications” animation_delay=”0″][cmsmasters_tr][cmsmasters_td align=”left”]Sockets supported (Intel)[/cmsmasters_td][cmsmasters_td align=”left”]Intel™ 115X, 2011-3*, 2066* *Square ILM[/cmsmasters_td][/cmsmasters_tr][cmsmasters_tr][cmsmasters_td align=”left”]Sockets supported (AMD)[/cmsmasters_td][cmsmasters_td align=”left”]AM4[/cmsmasters_td][/cmsmasters_tr][cmsmasters_tr][cmsmasters_td align=”left”]Coldplate material: [/cmsmasters_td][cmsmasters_td align=”left”]Copper,Micro Skived Fin[/cmsmasters_td][/cmsmasters_tr][cmsmasters_tr][cmsmasters_td align=”left”]Thermal paste[/cmsmasters_td][cmsmasters_td align=”left”]Pre-applied[/cmsmasters_td][/cmsmasters_tr][cmsmasters_tr][cmsmasters_td align=”left”]Fan Speed[/cmsmasters_td][cmsmasters_td align=”left”]200 – 1700 RPM (Controlled via PWM)[/cmsmasters_td][/cmsmasters_tr][cmsmasters_tr][cmsmasters_td align=”left”]Tube material[/cmsmasters_td][cmsmasters_td align=”left”]Low-permeability rubber with braided nylon sleeve[/cmsmasters_td][/cmsmasters_tr][cmsmasters_tr][cmsmasters_td align=”left”]Dimensions (w/o tubes)[/cmsmasters_td][cmsmasters_td align=”left”]98 mm x 78 mm x 53 mm[/cmsmasters_td][/cmsmasters_tr][cmsmasters_tr][cmsmasters_td align=”left”]Total Weight[/cmsmasters_td][cmsmasters_td align=”left”]1572 g (2 Fans, Radiator, Pump, Tubes)[/cmsmasters_td][/cmsmasters_tr][cmsmasters_tr][cmsmasters_td align=”left”]Power Consumption[/cmsmasters_td][cmsmasters_td align=”left”]1.0 W – 2.7 W (Pump and VRM Fan)[/cmsmasters_td][/cmsmasters_tr][/cmsmasters_table][cmsmasters_heading shortcode_id=”ty6be8qxm6″ type=”h2″ font_weight=”default” font_style=”default” text_align=”center” color=”#ffffff” bg_color=”#000000″ margin_top=”0″ margin_bottom=”20″ animation_delay=”0″]Packaging & Bundle[/cmsmasters_heading][cmsmasters_text shortcode_id=”s21jhs7ahm” animation_delay=”0″]
Have you ever turned off the textures in a game to see the wire-frame behind the graphics? The image of the cooler reminds us of that. The front doesn’t provide tonnes of information, but just about enough to get you going.

On the reverse, the 6 separate images are clear and well annotated to give you a good idea of what’s what.

Arctic have kept things super simple, helping to reduce the cost of the loop as much as possible. AMD and Intel mounting’s both use the same brackets and mounting systems, again, to save cost and complexity. You get given a small, single-use sachet of MX-4 thermal paste.

One thing we particularly like about Arctic’s approach to packaging is their attempt to be more environmentally friendly, one effort they’re pushing at the moment is to ditch the user manual which wastes a lot of paper and instead including a small sticker with a QR code. The manual is easier to follow on your phone anyway so this is a win-win from our point of view.

[/cmsmasters_text][cmsmasters_heading shortcode_id=”mxilfl40zl” type=”h2″ font_weight=”default” font_style=”default” text_align=”center” color=”#ffffff” bg_color=”#000000″ margin_top=”0″ margin_bottom=”20″ animation_delay=”0″]Closer Look[/cmsmasters_heading][cmsmasters_text shortcode_id=”rr121ryrwf” animation_delay=”0″]
Unlike any AIO we’ve tested so far, the fans are pre-installed onto the radiator. You remove the plastic packing from around the radiator and pump enclosure and you’re good to go.

The waterblock/pump enclosure is different from most, housing a small fan that blows air outwards to cool the surrounding VRM and other components.

The coldplate sits almost-centred but from this angle, the size of the pump/fan housing is evident. If you’re planning to install this onto a motherboard with a tighter socket design, double check your measurements.
Arctic P-series fans are installed onto the 280mm radiator inside the box, saving you the hassle of screwing them in. They’re also wired up through one of the radiator tubes to connect into the single 4-pin PWM connection on the pump, allowing the entire system to run in harmony and spin up and down as the motherboard deems fit.

Radiators are typically 25mm (1 inch) thick, but a simple and easy way to improve cooling performance is to increase the thickness of the radiator, therefore giving more surface area to dissipate heat. The radiator here is 38mm (1½ inch) thick. Providing the 140mm fans can provide enough static pressure, this should reduce CPU temperatures.
[/cmsmasters_text]
[cmsmasters_divider shortcode_id=”sxdveo1yd4″ width=”long” height=”0″ style=”solid” position=”center” margin_top=”10″ margin_bottom=”10″ animation_delay=”0″]
[cmsmasters_heading shortcode_id=”573ucw297x” type=”h2″ font_weight=”default” font_style=”default” text_align=”center” color=”#ffffff” bg_color=”#000000″ margin_top=”0″ margin_bottom=”20″ animation_delay=”0″]Installation[/cmsmasters_heading][cmsmasters_text shortcode_id=”dxrumzxya” animation_delay=”0″]
First things first, we need to tell you that the installation didn’t go to plan within our Corsair 680X chassis, causing us to do something a little unorthodox, and something that we’re not particularly proud of, but we’re confident that the results will be largely reliable and representative of the product’s true potential.
The first step is mounting the studs through the Intel socket. This was, and there’s no easy way to say this, absolutely painstaking. Arctic, instead of providing something like a rubber o-ring, or furnishing the metal hardware with rubber edges, give you 8 small plastic stickers that you’re to place around each of the mounting holes, on both sides, to prevent damage occurring to the motherboard. Unless you have the hands of a new-born infant and the dexterity of a brain surgeon, you’ll struggle here, particularly with the top-right most, inside those VRMs and power phases.

Next up is mounting the two crossbars onto the pump housing with a small screw holding each side in place.

You can then go ahead and install the radiator into the case. Unfortunately, this is where we ran into some trouble. We had to disconnect the 8-pin CPU power and remove one of the 4 mounting screws on the left fan to get it into place, but it was then impossible to install the 8-pin CPU power back into place. The issues we faced are because of the 38mm thick radiator, in place of the usual 25mm thickness.

We removed the cooler again and had a think, toying with the idea of installing the radiator into the front of the chassis instead, or even testing it outside of the case, but neither of those would provide anything close to a reliable result, so instead, we got it 95% in place and used a couple of small cable ties instead. It’s not elegant, by any means, but it allows us to close the door of the case and have it almost in the same position as other AIO radiators that we’ve tested.

We then apply some Noctua NT-H1 thermal paste onto the 9700K and to ahead with the install of the pump enclosure. We didn’t have a great deal of clearance left over when installing this, so tighter motherboards might present an issue.
Then it’s a case of plugging in the single 4-pin PWM which controls both 140mm fans, the small pump-mounted fan and the waterpump. It’s perhaps the only simple part of the entire installation procedure so far.

[/cmsmasters_text][cmsmasters_heading shortcode_id=”ni7oax5hrh” type=”h2″ font_weight=”default” font_style=”default” text_align=”center” color=”#ffffff” bg_color=”#000000″ margin_top=”0″ margin_bottom=”20″ animation_delay=”0″]Test Setup & Methodology[/cmsmasters_heading][cmsmasters_text shortcode_id=”peoqfbdam” animation_delay=”0″]
Due to popular demand, we have retired the long-standing cooling rig that we once used and replaced it with a shiny new system with an Intel Core i7 9700K at its heart. This should benefit you, the reader, in a couple of ways. The first being it can provide you with results on a CPU that is currently available to buy and secondly, the mounting instructions on our installation page will be far more relevant than the outgoing LGA 2066 was, with its pre-installed backplate.
We perform two individual testing routines with each CPU cooler that we receive – temperatures and acoustics. The system used is as follows and all tests are performed at stock frequencies.

Processor – Intel Core i7 9700K
Motherboard – GIGABYTE Z390 AORUS MASTER
Memory – Corsair Vengeance RGB PRO 16GB – 2666MHz – C16
Video Card – XFX AMD Radeon RX560
Power Supply – Corsair RM650x
Storage Drive – Western Digital Black SN750 1TB NVMe SSD
Case – Corsair Crystal Series 280X RGB
Monitor ASUS ROG SWIFT PG278Q
We test our fans at both 1000 RPM and maximum RPM, or if the fan only has one setting, it’s only included in the maximum RPM graphs.
Firstly, we’ll test acoustics, both as a case fan, mounted on the rear of our Corsair Graphite 760T chassis, and as a radiator fan on the Corsair H100i Pro RGB. (with the pump turned down to 1,100 RPM and all other case fans disabled). We measure the average dB(A) noise levels over 60 seconds in a quiet room with an ambient noise level of around 24dB(A). Acoustics are measured from the same point within the case (20cm from the fan), with every effort taken to ensure test parameters are as close as possible during every test.
We then test the fan’s performance both at 1000 RPM and maximum RPM by running an AIDA64 20-minute stress test while running only a single 120mm fan on the 240mm radiator of the Corsair H100i Pro RGB. This allows us to test single fans as well as multi packs by only relying on a single 120mm fan. We mount the fan under the radiator, inside the case, blowing through the radiator. We measure the average core temperature over a 60-second period and minus the ambient room temperature from this. That leaves us with a Delta °C measurement which is applied to the graphs. Our average room temperature is kept as close to 21°C as possible, roughly the room temperature of most homes and offices. Obviously, if you live in a warmer climate with warmer room temperatures, you can expect higher temperatures.
To ensure the fans RPM are measured consistently, we use the Noctua NA-FC1 fan control unit, allowing the speed of our fans to be infinitely adjusted and monitored via a nearby header on the motherboard.
[/cmsmasters_text][cmsmasters_heading shortcode_id=”ygiz3dbawo” type=”h2″ font_weight=”default” font_style=”default” text_align=”center” color=”#ffffff” bg_color=”#000000″ margin_top=”0″ margin_bottom=”20″ animation_delay=”0″]Benchmarks[/cmsmasters_heading][cmsmasters_text shortcode_id=”04wx17ge48″ animation_delay=”0″]
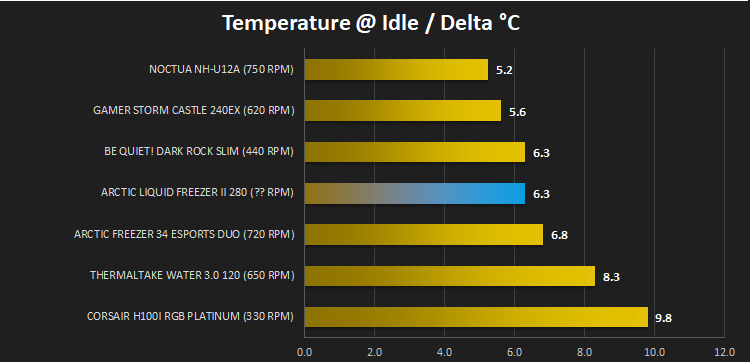
Thermal Results
For thermal results we have all case fans running and only a single 120mm fan on our Corsair H100i Pro RGB radiator. We then measure the thermal results at idle, both at 1000 RPM and maximum RPM:
And then again after a 20 minute Stability Test within AIDA64:

Acoustic Results
For our acoustic results, all other fans in the case are disabled and the Corsair’s H100i Pro RGB’s pump is turned down to quiet (roughly 1100 RPM) and measure the fan noise at 1000 RPM, both as a case fan and as a radiator fan:

And then again at maximum RPM:

[/cmsmasters_text]
[cmsmasters_divider shortcode_id=”cgrlfzlq4u” width=”long” height=”1″ style=”solid” position=”center” margin_top=”10″ margin_bottom=”10″ animation_delay=”0″]
[cmsmasters_heading shortcode_id=”823u4wnlq” type=”h2″ font_weight=”default” font_style=”default” text_align=”center” color=”#ffffff” bg_color=”#000000″ margin_top=”0″ margin_bottom=”20″ animation_delay=”0″]Conclusion[/cmsmasters_heading][cmsmasters_text shortcode_id=”q2u69mzwu” animation_delay=”0″]
Arctic, known for their cost-effective approach to component cooling, has hit the nail on the head in terms of price to performance, but there are some pitfalls which must be considered.
First and foremost, do make sure you take our performance numbers with a pinch of salt. Due to the single 4-pin PWM connection for the pump, pump-fan and two 140mm fans, we weren’t able to get a fan speed reading, and with our ‘inventive’ approach to mounting the radiator, our numbers might’ve been slightly different if we could’ve installed it properly.
Starting off with thermals, the Liquid Freezer II topped our graphs in the load test and wasn’t far off the mark in the idle test either, but moving onto acoustics, things take a bit of a tumble, and it’s that tiny little fan that’s causing the issue; because it’s so small, it has to spin at several thousand RPM to produce any meaningful airflow, but that makes it noisy. It was, by a long way, the most noticeable component in the case in our idle acoustics test, with the noise reading dropping from 29.1dB(A) to 27.7dB(A) with a finger pressed onto that fan. Giving the system some load, the small fan was less noticeable, but the buzz was still there.
The installation, while usually only being done once or twice during the life of a cooling solution, was still massively overcomplicated. Sticking those stickers onto your motherboard was ridiculously fiddly and next to impossible for the top-right one, on the component side. And not only that, it makes it impossible to re-use the cooler on your next motherboard unless you can somehow remove them again without breaking them or damaging your board.
£79.99 in the UK for this cooler, with the performance we witnessed, is fantastic value for money but the installation process and that little fan on the waterblock does somewhat ruin the experience overall. Perhaps this is why other manufacturers aren’t installing small fans onto their waterblocks.
Great value and incredible performance but being fundamentally flawed makes this difficult to recommend. If only there was a simple method of disabling that small VRM fan.
+ Excellent cooling ability
+ Cracking value for money
+ Simple one-stop connection for all fans + pump
+ Eco-friendly instruction manual
– Fiddly and overcomplication install
– 38mm thick radiator won’t fit all chassis
[/cmsmasters_text][/cmsmasters_column][/cmsmasters_row]


